What you’ll find on this page
White Label Configuration is the control center for your branded app. At the top, you’ll see two tabs:- Configuration: core settings that affect how your app works (especially the domain and DNS).
- Appearance: the visual identity your customers will see (colors, logos, favicon, and default theme).
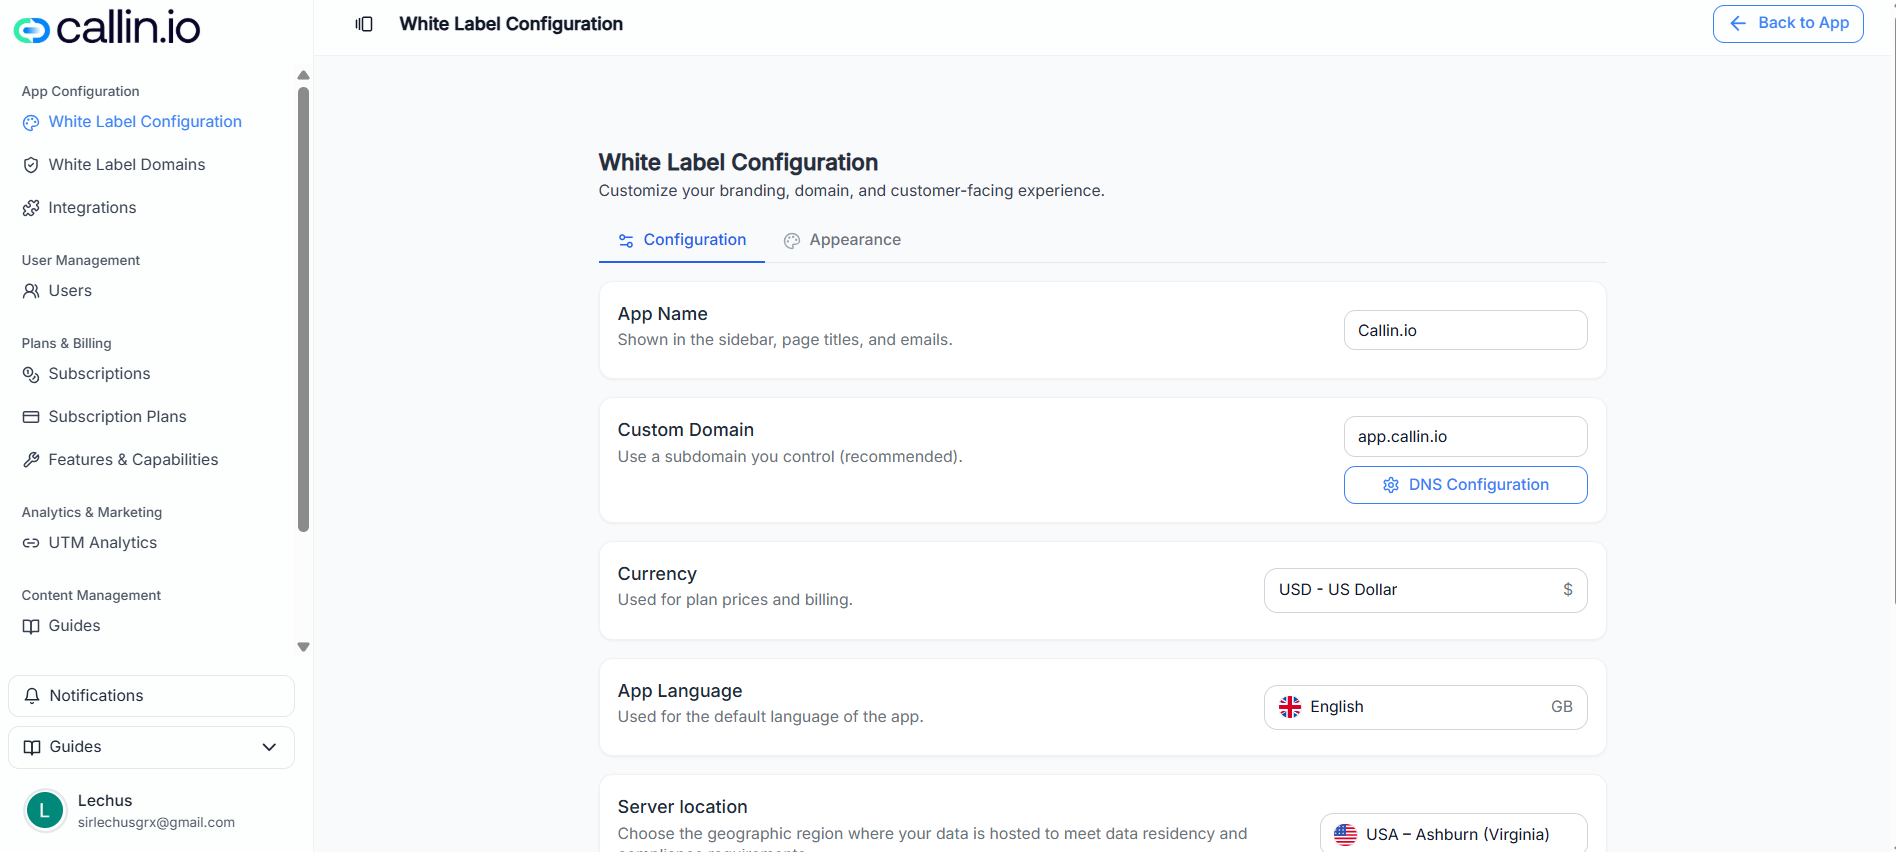
Screenshot: the “Configuration” tab where you define your app name, custom domain, and default settings like currency and language.
Important: Some settings can vary depending on your plan and permissions.
Configuration
App Name
App Name is what customers will recognize across the experience—like the label in the app navigation and page titles. A good rule: use the same name you use in your sales materials.Example: if you sell “Northwind Reception,” set the App Name to Northwind Reception.
Custom Domain (recommended: use a subdomain)
In Custom Domain, enter the domain customers will use to access the app. Callin recommends using a subdomain you control, for example:app.yourdomain.com
- Your root domain (like
yourdomain.com) typically hosts your marketing website, landing pages, blog, and tracking scripts. - Keeping the product on
app.yourdomain.comhelps avoid conflicts and keeps your website setup independent.
Tip: Pick a simple subdomain your customers will remember:app,portal, ordashboard.
DNS Configuration
After you enter your custom domain, click DNS Configuration. This opens a modal with two ways to set up DNS:- Provider (automatic-assisted)
- Manual (you add the records yourself)
Provider (automatic-assisted setup)
Use Provider when your DNS provider is supported. The idea is: you select your provider and Callin helps you discover what’s needed for your domain setup. What you do:- Open the Provider tab.
- In DNS Provider, select your provider (examples you may see include Cloudflare, GoDaddy, and Namecheap).
- Click Discover.
- Callin will attempt to guide you through the DNS setup for the domain you entered.
- If something fails, you may see an error banner like “Something went wrong…”—that usually means the domain configuration or DNS records don’t match what’s expected yet.
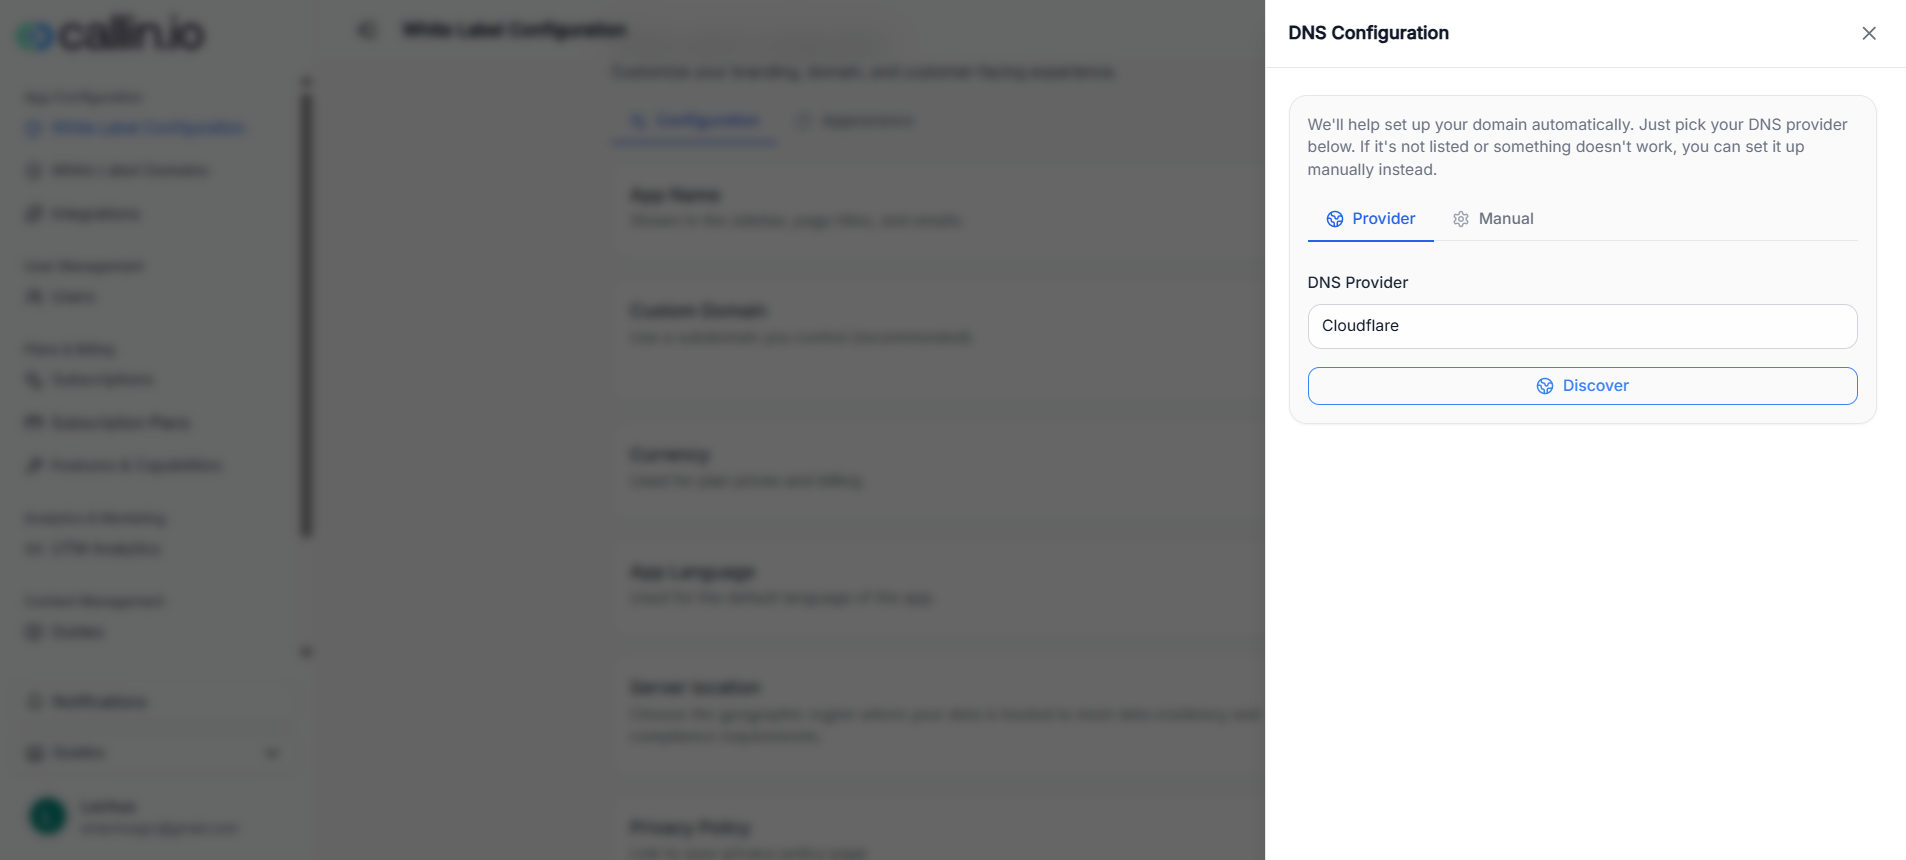
Screenshot: Provider-based DNS setup where you pick a DNS provider (e.g., Cloudflare/GoDaddy/Namecheap) and run Discover.
Common mistake: DNS changes don’t apply instantly. If you just edited records, wait a bit and try again.
Manual (add DNS records yourself)
Use Manual if:- Your provider is not listed, or
- Provider setup fails, or
- You prefer to manage DNS yourself.
- Type (for example, A or CNAME)
- Name (for example,
@orapp) - Value (the destination)
- TTL (often “300 or auto” depending on your provider)
- Open Manual.
- Add each DNS record exactly as shown in the table.
- When the records are in place, click Install SSL to complete the setup.
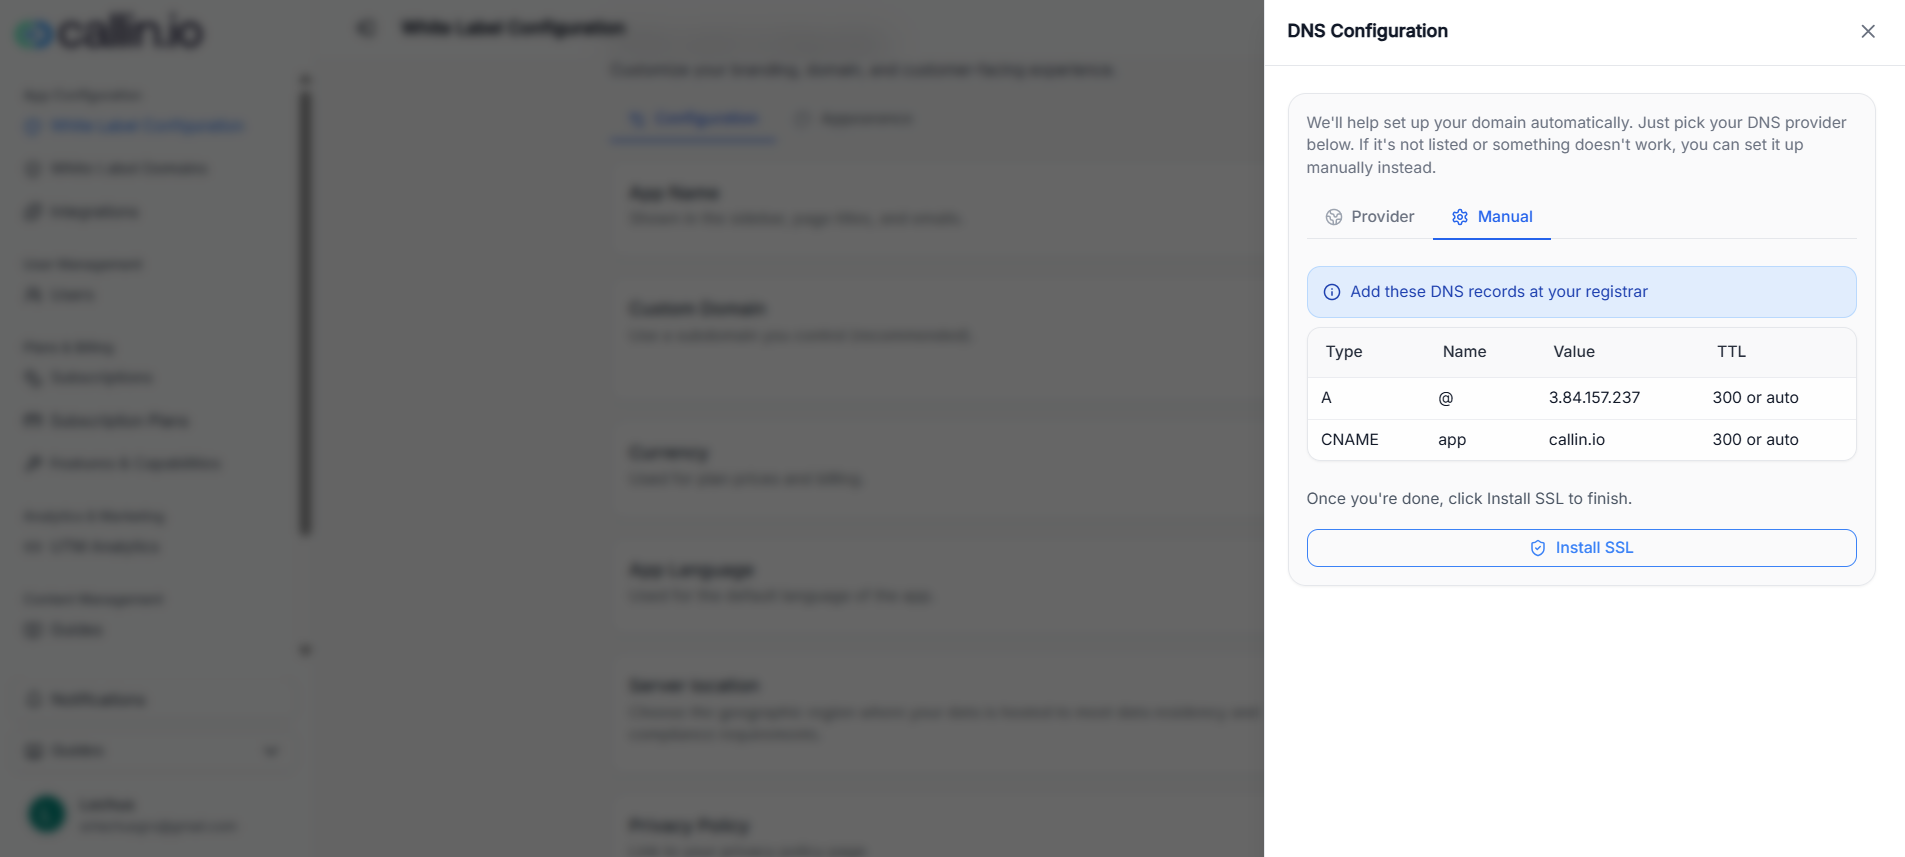
Screenshot: Manual DNS setup with the exact records to add and the “Install SSL” button to finalize.
Important: Only click Install SSL after the DNS records are added and have propagated. Propagation time depends on your DNS provider.
Tip: If you’re unsure where to add records, search your DNS provider docs for “add A record” and “add CNAME record.” The field names in their UI can vary.
Currency
Currency is used for plan prices and billing display. Set it to match how you plan to charge customers (for example, EUR or USD). This is especially important if you will create subscription plans and charge through a payment provider (like Stripe), because customers expect consistency between pricing and billing.App Language
App Language sets the default language your customers will see in the app interface. If you serve customers in multiple countries, choose the language that fits your primary audience. (Customers may still have different preferences depending on your setup and available languages.)Server location
Server location lets you choose the geographic region where data is hosted to meet data residency and compliance requirements. If you work with customers that have strict requirements (healthcare, finance, public sector), align this setting with what you promised contractually.Privacy Policy and Terms of Use
These fields let you link to your legal pages:- Privacy Policy: where you explain how you handle personal data.
- Terms of Use: the rules customers agree to when using your service.
Tip: Even if you’re an agency, treat this like a product: publish these pages on your main website (root domain) and link them here.
Appearance
When your domain and core settings are ready, move to the Appearance tab to match the UI to your brand.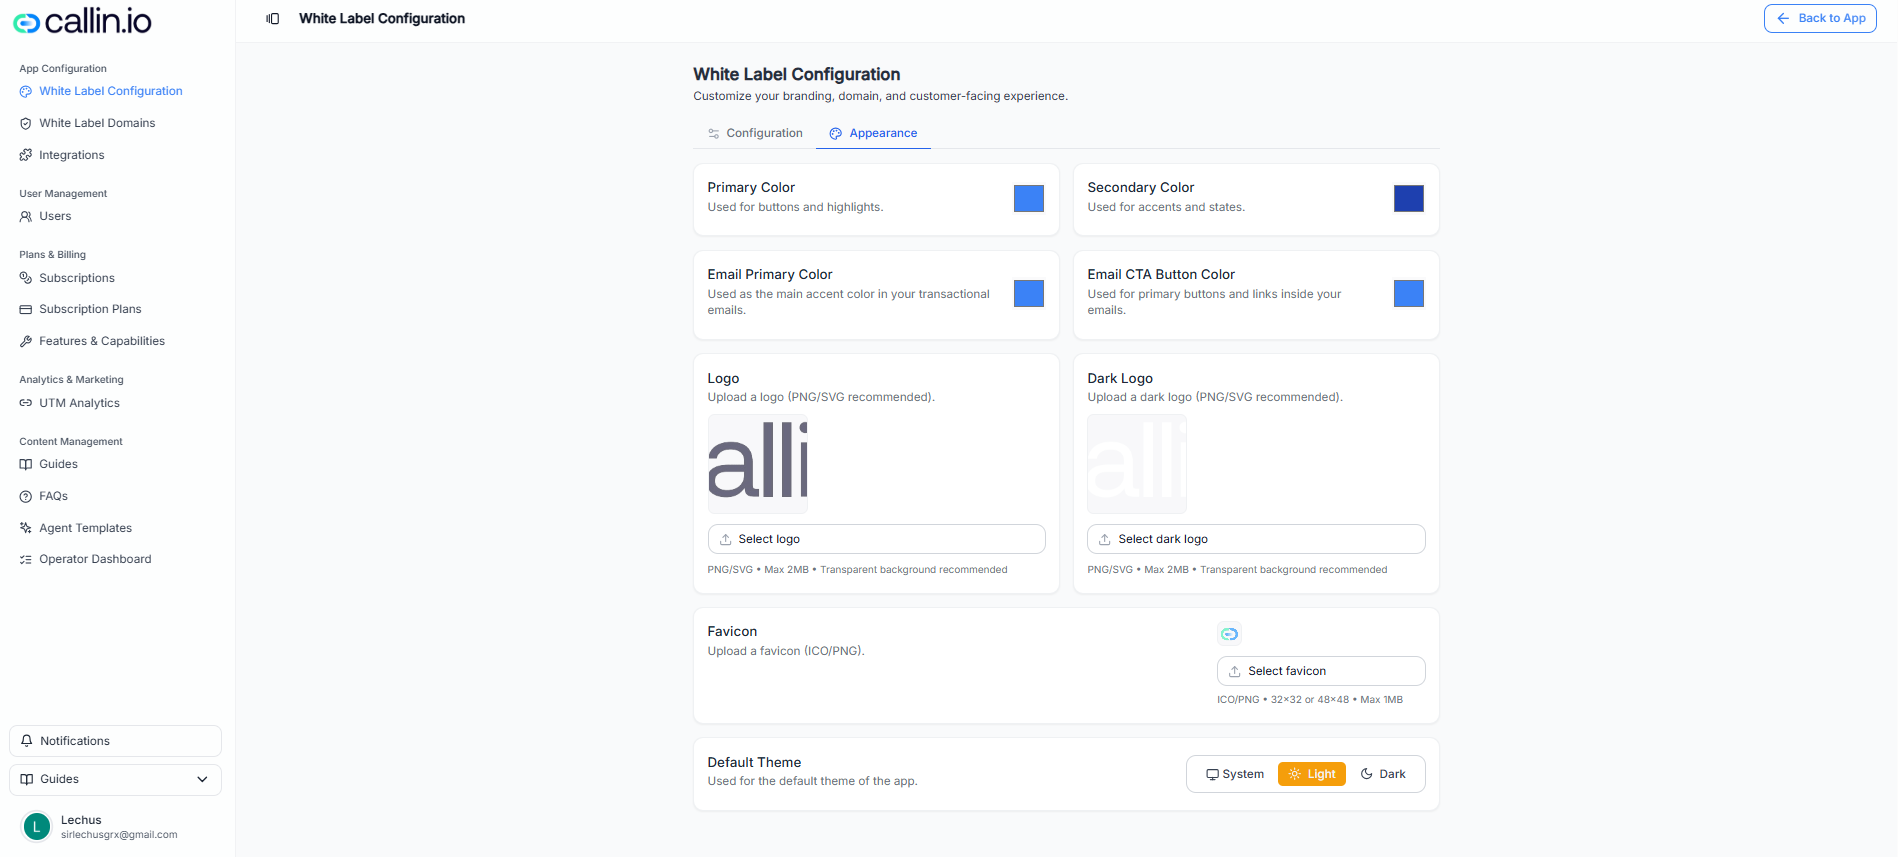
Screenshot: the Appearance tab where you customize colors, upload logos and favicon, and choose a default theme.
Colors
You’ll typically see color controls such as:- Primary Color: used for buttons and key highlights in the app.
- Secondary Color: used for accents and UI states.
- Email Primary Color: the main accent color in transactional emails.
- Email CTA Button Color: the color used for primary buttons and links inside emails.
Tip: If your brand already has a style guide, start with your primary brand color, then pick a secondary color that still looks good on both light and dark backgrounds.
Logos (light and dark)
You’ll usually upload:- Logo: for light backgrounds
- Dark Logo: for dark backgrounds
Important: Use PNG (ideally with transparent background) or SVG if available. If your logo appears tiny, it’s often because the image you uploaded includes a large white margin/border around the logo—Callin scales the full image down to fit. A tight, transparent PNG usually solves it.
Favicon
The Favicon is the small icon shown in the browser tab and bookmarks. Use an ICO or PNG sized for favicons (common sizes include 32×32 or 48×48).Default Theme
Default Theme controls how the app looks by default:- System: follows the user’s device theme
- Light: forces light mode
- Dark: forces dark mode