

Overview
Tools (webhooks) allow your Callin agent to connect with external systems in real time while speaking with a user. Put simply: a tool is an automatic action the agent can run to ask or send information to another system (for example, your CRM) without interrupting the conversation. With a tool, your agent can:- Send data the user says during the call (for example: name, email, phone, reason).
- Query data from an external system (for example: status, availability, verification).
- Trigger automations in external platforms (CRM, tickets, messaging, workflows, etc.).
Callin agents can’t send keypad tones (DTMF), for example to press 1 when a phone menu answers. This isn’t possible with a tool, a webhook or any other setting.
- Tools: your webhook tools. This is what this guide covers step by step.
- MCPs: connections to MCP servers, which give your agent a whole set of ready-made tools at once (see Connect an MCP server).
1
Create the tool in the Tools section.
2
Assign the tool to the agent in AI Agents.
3
Specify in the Conversation Prompt field when it must run and what the agent should do with the result.
Before you start (concepts in 60 seconds)
- Tool: a connection that lets the agent “talk” to another system (for example, a CRM).
- URL: the address Callin sends the request to.
- GET: used to query information (“Does this contact exist?”).
- POST: used to send information (“Create this lead with these details.”). PUT (update) and DELETE (remove) are also available.
- Body: the data the agent will send (email, phone, name, etc.).
- Required: mandatory fields. If one is missing, the result may be incomplete or the flow can fail.
If your user is not technical, keep this idea: the tool creates the connection, and the Conversation Prompt decides when it is used and with which data.
Step 1 — Create a tool (webhook)
To create a tool in Callin:1
Go to Tools & MCP in the Callin dashboard (open Tools & MCP).
2
Click + Add Tool. The Create Tool panel opens on the right.
3
Fill in the main fields:
- Name
Use a short, clear, stable name. Recommendation: verb + objective. It can have 1–64 characters: only letters, numbers, underscores (_) or hyphens (-), with no spaces.
Examples:query_crm_contact,create_crm_lead,send_registration_link. - Description (required)
Explain what it does and, especially, when it must be used (at what moment in the call).
Example: “Check whether the contact exists in the CRM only after confirming email and phone.” - Method
- Use GET if you are going to query information.
- Use POST if you are going to send information (most common when the agent collects data and sends it).
- Use PUT to update existing data, or DELETE to remove it, if your API works that way.
- URL
Paste the HTTPS URL of your API or your external platform webhook.
Make sure the URL is HTTPS and publicly accessible. If the endpoint is not accessible, the tool will not work.
Video: Add Tool → name, description, method and URL → speech and sound settings → a header → a body field.
Timing and speech settings
Below the URL, you can decide how the tool behaves during the conversation:- Timeout: how long to wait for your endpoint to respond before giving up, from 5 to 120 seconds. Default: 20 seconds.
- Block interruptions: turn it on so the caller can’t cut in while the tool runs.
- Speak first: Agent decides (the agent decides whether to say something before running the tool, based on how long it usually takes) or Always speak (the agent always speaks before running it, for example “Give me a second while I check”).
- When to run: when the tool runs compared to what the agent says:
- Right away: it runs immediately.
- After speech: it runs after the agent finishes speaking.
- In background: it runs in the background, so the conversation can continue while it works.
- Sound: an optional sound while the tool runs: None, Typing or Elevator 1–4. Use the play button next to it to preview the sound. When you pick one, When it plays appears: With speech or Always.
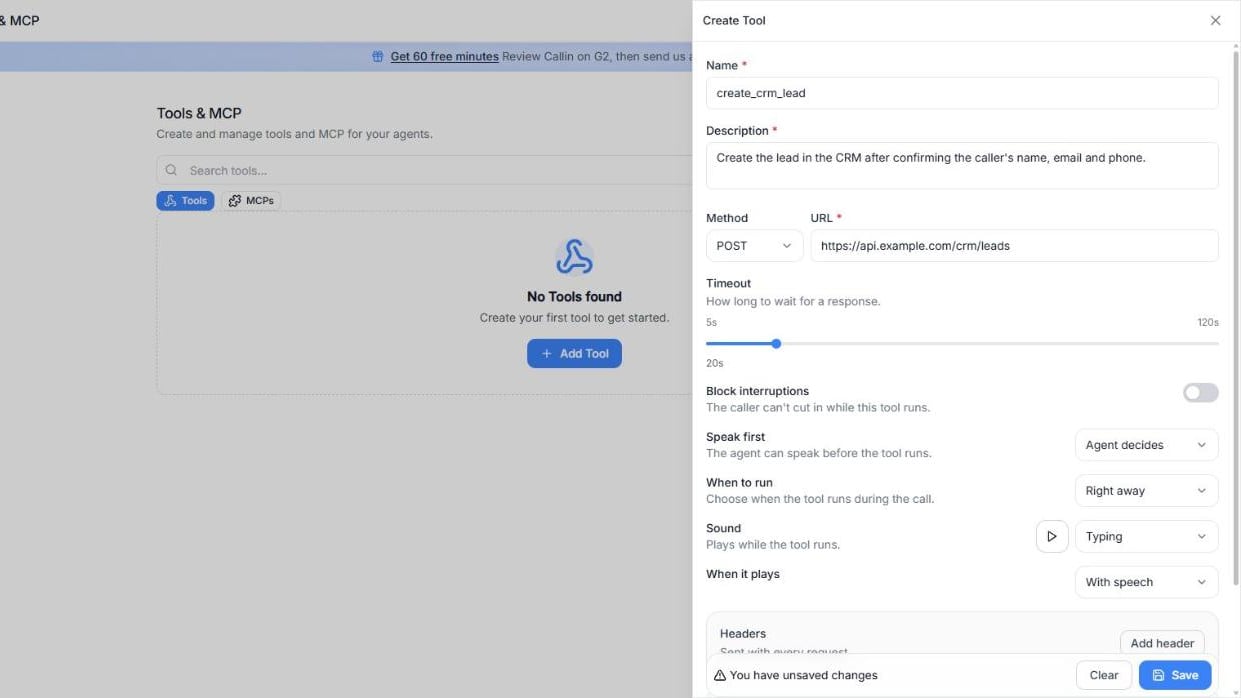
Screenshot: The Create Tool panel with the timing and speech settings.
Configure “Body” (if you use POST)
If your tool sends information (POST), define exactly which data it will send. The agent (the LLM) collects these parameters during the call and sends them as the body of the request.1
Go to Body and click Add field.
2
Optionally, add a general Description of the data you send.
3
Configure each field:
- Type: String (text), Number, Boolean (true/false) or Integer (whole number).
- Name: the exact field name your endpoint expects (for example:
email,phone,full_name). - Required: on by default. Turn it off if the field is optional.
- Value Type: where the value comes from:
- LLM Prompt: the agent fills it in from the conversation. Add a Description with what it represents and the expected format (for example: “Phone in international format” or “Valid email address”). You can also add Enum Values (optional): a list of allowed values. If you add them, the agent can only choose from that list.
- Constant Value: always sends the same fixed value (for example, the name of your campaign).
- Dynamic Variable: sends the value of a call variable. Type it in Variable or pick it from the System list, for example
system__caller_id(the caller’s number),system__called_number,system__conversation_idorsystem__time_utc.
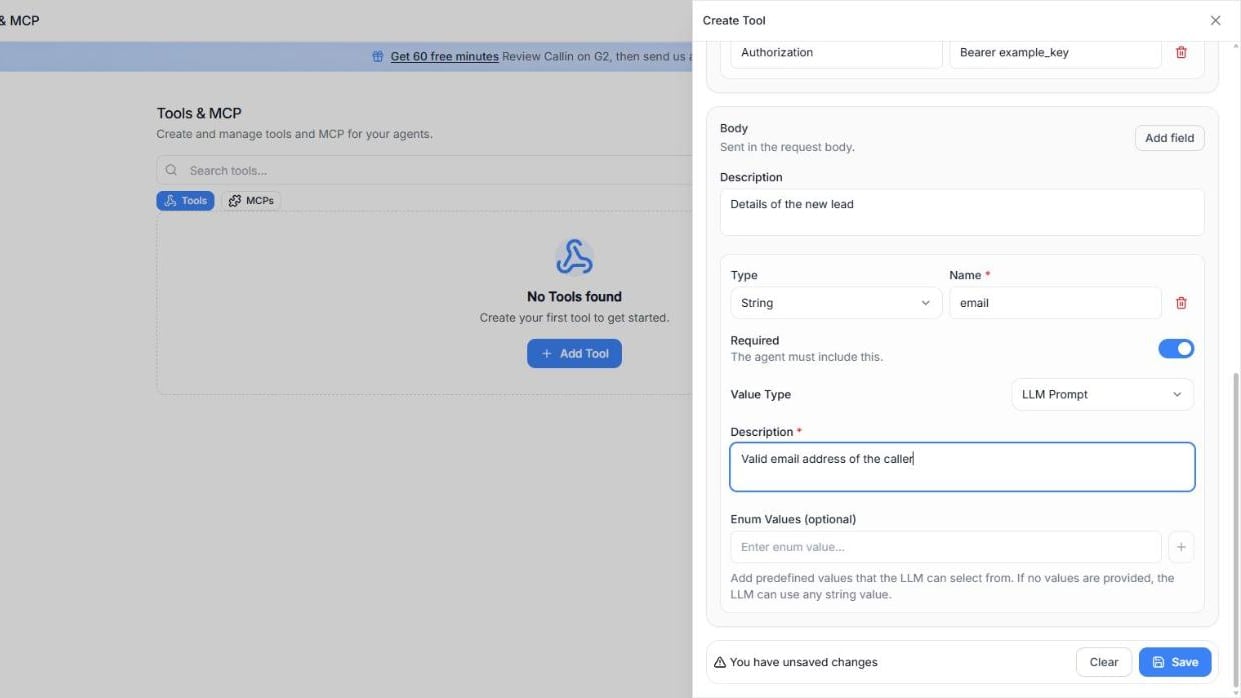
Screenshot: A body field that the agent fills in from the conversation (LLM Prompt).
Practical recommendation: if you mark a field as Required, your agent must be forced (via the Conversation Prompt) to ask for it and confirm it before running the tool. Otherwise, the webhook will receive incomplete data or the flow will fail.
Headers and authentication (if applicable)
If your endpoint requires authentication (for example, a token or key), add it in Headers:1
Click Add header.
2
Fill in the Name (for example,
Authorization) and the Value (for example, Bearer followed by your key), exactly as your API requires.Connect an MCP server (MCPs tab)
An MCP server gives your agent a whole set of tools at once (for example, all the actions of your CRM), without creating them one by one. To add one:1
In Tools & MCP, open the MCPs tab and click + Add MCP.
2
In Basic Information, fill in the Name (for example, “CRM MCP”) and a Description of what the server provides.
3
In Server Configuration, choose the Server type (SSE or Streamable HTTP) and paste the Server URL.
4
If the server needs authentication, add it in HTTP Headers with Add header.
5
Choose the Tool Approval Mode:
- Always Ask: maximum security. The agent asks for permission before each tool use.
- Fine-Grained Tool Approval (selected by default): you choose which tools are disabled and which can run automatically.
- No Approval: the agent can use any tool without approval.
6
Click Create.
Video: Add MCP → name, description and server URL → Tool Approval Mode, and then the agent’s Tools tab, where you add tools and MCPs to the agent.
Step 2 — Assign the tool to an agent
Creating the tool is not enough. You must assign it to the agent:1
Go to AI Agents.
2
Select the agent you want to configure.
3
In the agent editor, open the Tools tab.
4
In the Tools sub-tab, click Add Tool.
5
Search for your tool and select it. You can also click Add Webhook Tool to create a new one from there.
6
Save the agent.
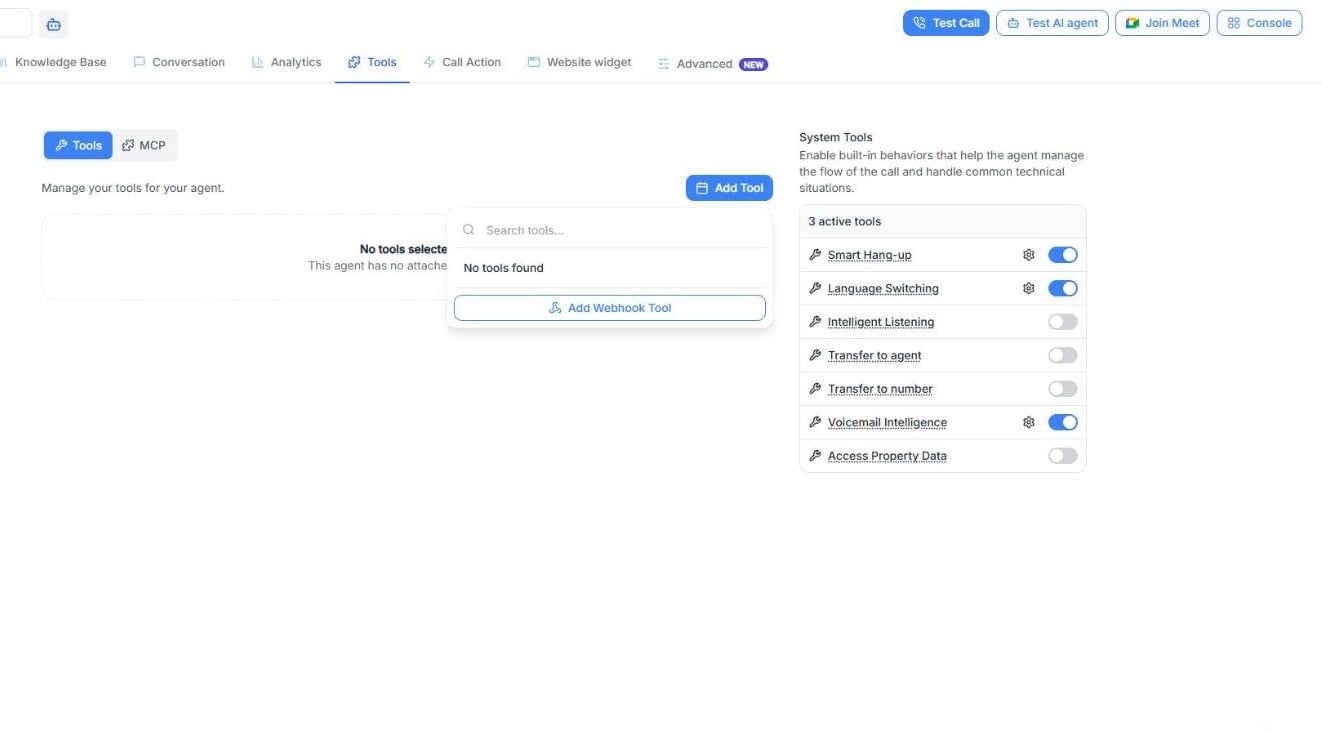
Screenshot: The agent’s Tools tab. Add Tool lists the tools you created in the Tools section.
If the tool appears in the agent’s list, it is assigned correctly. If it does not appear, the agent will not be able to run it.
Step 3 — Specify how to use the tool in “Conversation Prompt”
This is the most important step. The agent will only run the tool if the Conversation Prompt clearly tells it:- What data it must collect before running it (required fields).
- How to confirm that data (to reduce errors).
- When it must run it (exact moment in the call).
- What it must say right after running it (including exact phrases if your process requires them).
- What it must NOT do (to avoid mixing flows or acting too early).
Key rule (for non-technical users)
If you don’t tell the agent “when” and “under what conditions” to use the tool, the agent may:- use it too early,
- use it with incomplete data,
- or never use it at all.
Example 1 — Connect to a CRM in real time (query + create)
This example covers a very common case: the agent speaks with a user and, before continuing, checks the CRM to see if the contact already exists. If it doesn’t, it creates the user as a lead and continues the call.Tools used in this example
Tool 1: Query_CRM_ContactGoal: check whether the contact already exists in the CRM.
When it is used: right after confirming email + phone.
Expected result: “found / not found” and, if found, basic details (for example: name and status). Tool 2: Create_CRM_Lead
Goal: create a lead if the contact does not exist.
When it is used: only if the previous query returns “not found”.
Minimum recommended data: name, email, phone, reason.
Conditions to run the tools (very important)
- The agent must not run any tool until:
- the email is confirmed (repeated and confirmed by the user),
- and the phone is confirmed (repeated and confirmed by the user).
- If the user hesitates or corrects a detail, the agent must update it and confirm again before continuing.
What to write in the Conversation Prompt (invented text, easy to adapt)
Flow objective: Collect basic details → confirm them → query the CRM → if not found, create a lead → continue the conversation. Clear instructions for the agent (example):- During the call, collect and confirm these details:
- First and last name
- Phone
- Reason (one short sentence)
- To confirm:
- Repeat the email and ask: “Is that correct?”
- Repeat the phone and ask: “Is that correct?”
- Only when email and phone are confirmed:
- Run Query_CRM_Contact.
- If the result indicates the contact exists:
- Tell the user: “Perfect, I can already see your record. Let’s continue.”
- Do not invent details. If the status comes in the result, you may mention it neutrally.
- If the result indicates the contact does not exist:
- Tell the user: “Perfect, I can’t find you yet. I’ll register you now and we’ll continue.”
- Run Create_CRM_Lead with the confirmed details.
- After creating, confirm: “Done, you are now registered. Let’s continue with the next step.”
- If the tool fails or returns no response:
- Do not say technical information.
- Say: “I couldn’t check it right now. Let’s continue, and if needed we’ll review it at the end.”
- Do not repeat tools in a loop.
How it would look in a call (conversation example)
Agent: “Perfect. To help you, I just need a few quick details. What’s your first and last name?”User: “Giulia Conti.”
Agent: “Thanks, Laura. What’s your email?”
User: “laura.martin@example.com”
Agent: “Great. I understood: laura dot martin at example dot com. Is that correct?”
User: “Yes.”
Agent: “Perfect. What’s your phone number?”
User: “Six six five, one two three, four five six.”
Agent: “Perfect. Confirming the phone: 333 123 4567. Is that correct?”
User: “Yes.”
Agent: “Thanks. One last thing: in one sentence, what’s the reason for your call?”
User: “I want information about the plans.”
Agent: “Perfect. I’m going to check if you’re already registered and then we’ll continue.” (The agent runs Query_CRM_Contact)
- If found:
Agent: “Perfect, I can already see your record. Let’s continue with the information about plans.” - If not found:
Agent: “Perfect, I can’t find you yet. I’ll register you now and we’ll continue.”
Flow safety rules (to avoid errors)
- Do not run tools with unconfirmed data.
- Do not invent CRM results: only use what comes back in the response.
- Do not retry the tool repeatedly if it fails: continue and offer to review it later.
- Do not mix flows: first CRM (verify/create), then the rest of the process.
Example 2 — Send links at the right moment (during the call and at the end)
Below is a complete (invented) example with two tools: a main link during the call and an access link at the end. Tool 1: Send_Registration_Link (Link A)Goal: send the main link where the user completes the full primary process.
When it is used: during the call, only when the user confirms they want to continue and email + phone are confirmed. Link A includes (inside the link itself):
1
Initial registration (required details)
2
Verification/confirmation of information
3
Plan or option selection
4
Payment setup (if applicable)
5
Acceptance of terms or signature (if applicable)
6
Document upload (if applicable)
7
Final confirmation
- The user clearly says they want to continue.
- The email is confirmed (repeated and confirmed by the user).
- The phone is confirmed (repeated and confirmed by the user).
“Open the link we just sent you and scroll down to the ‘Initial registration’ section. Fill in your details and tell me when you’re ready to continue.”Rules during the call (very important):
- Do not ask the user to leave Link A to do steps somewhere else during the call.
- Do not ask them to log into a separate portal while they are completing the main process.
- Guide the user step by step, always from where they currently are.
Tool 2: Send_Portal_Link (Link B)
Goal: send the secure portal access link so the user can review progress later.
When it is used: only at the end of the call. Exact phrases after sending Link B (invented example):
“Here is the link to access your secure portal.”Final closing (invented example):
“We also sent you emails with your login details.”
“If you can’t find them, use your email search and type our company name to locate them.”
“Thank you for your time. If you need help with any step, we’re available to assist you.”
Step 4 — Test the tool before using it in production
Before using the tool with customers, validate that:- The request runs successfully.
- The fields arrive with the expected name.
- The required fields (Required) are always present.
- The endpoint responds quickly and consistently.
Quick checklist (30 seconds)
- The tool is created and saved in Tools.
- The tool is assigned to the agent in AI Agents > your agent > Tools.
- The Conversation Prompt clearly specifies:
- what data to ask for,
- how to confirm it,
- when to run the tool,
- and what to say right after.
Common errors and how to fix them
Final tip
To achieve a stable result:- Start with a simple tool.
- Define only a few required fields at the beginning.
- In the Conversation Prompt, be explicit about:
- execution conditions,
- flow order,
- exact phrases (if applicable),
- and prohibitions (what the agent must not do).