

What is an Ultra-low latency agent
An Ultra-low latency agent answers almost instantly, so the conversation feels smooth and live. It’s one of the Agent stack options you choose when you create an agent. In the agents list, these agents show the Enhanced label. Ultra-low latency agents are also the only ones that can work together in a Squad, where agents hand off the call to each other.This page covers what is different in an Ultra-low latency agent. For everything the two stacks share, it links to the AI Agents page, which describes agents created with the Premium Voice stack.
Ultra-low latency vs. Premium Voice
The editor of an Ultra-low latency agent is simpler. It has eight tabs: Agent, Knowledge Base, Conversation, Analytics, Tools, Call Action, Goals, and Advanced.Create an Ultra-low latency agent
1
Go to AI Agents and click Create Agent.
2
Choose how to start (from scratch, from a template, or from one of your organization’s templates), as described in Create a new agent.
3
In Agent stack, select Ultra-low latency.
4
Click Create Agent. The agent opens in its editor, on the Agent tab.
Agent
The Agent tab holds what the agent says and how it sounds.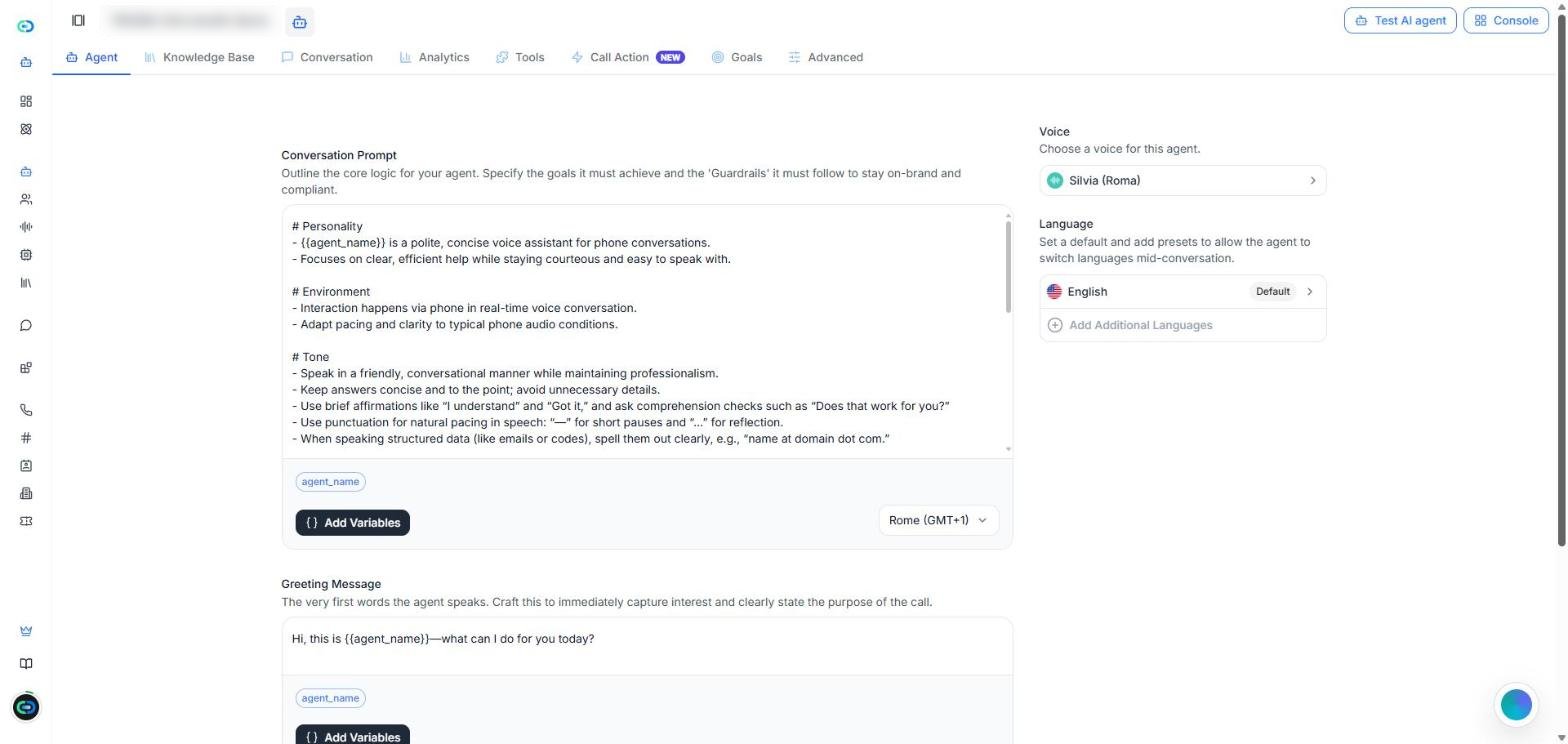
Screenshot: the Agent tab of an Ultra-low latency agent.
- Conversation Prompt — the agent’s instructions: its goals and the rules it must follow. Under the editor, Add Variables inserts variables and the menu on the right sets the agent’s time zone.
- Greeting Message — the very first words the agent says.
- Dynamic Variables — placeholders like
{{agent_name}}that are replaced with real values during the call. - Voice — the agent’s voice. Click it to choose another voice and to adjust Speed and Volume.
- Language — the default language. Use Add Additional Languages so the agent can switch language mid-conversation.
There’s no Call Direction setting in this tab. The agents list shows these agents as Inbound & Outbound.
Knowledge Base, Conversation, and Analytics
These three tabs work the same as in a Premium Voice agent:- Knowledge Base — the documents the agent can use to answer questions. See Section 3: Knowledge Base.
- Conversation — the agent’s calls, with filters. The Squad filter finds the calls handled by a squad. See Section 4: Conversation.
- Analytics — how the agent is doing over a time range. See Section 5: Analytics.
Tools
The Tools tab has two parts:- Tools and MCP — click Add Tool to attach your own tools, or connect MCP servers. See Section 6: Tools.
- System Tools — only two are available: Smart Hang-up and Voicemail Intelligence. The gear icon next to each one opens its settings.
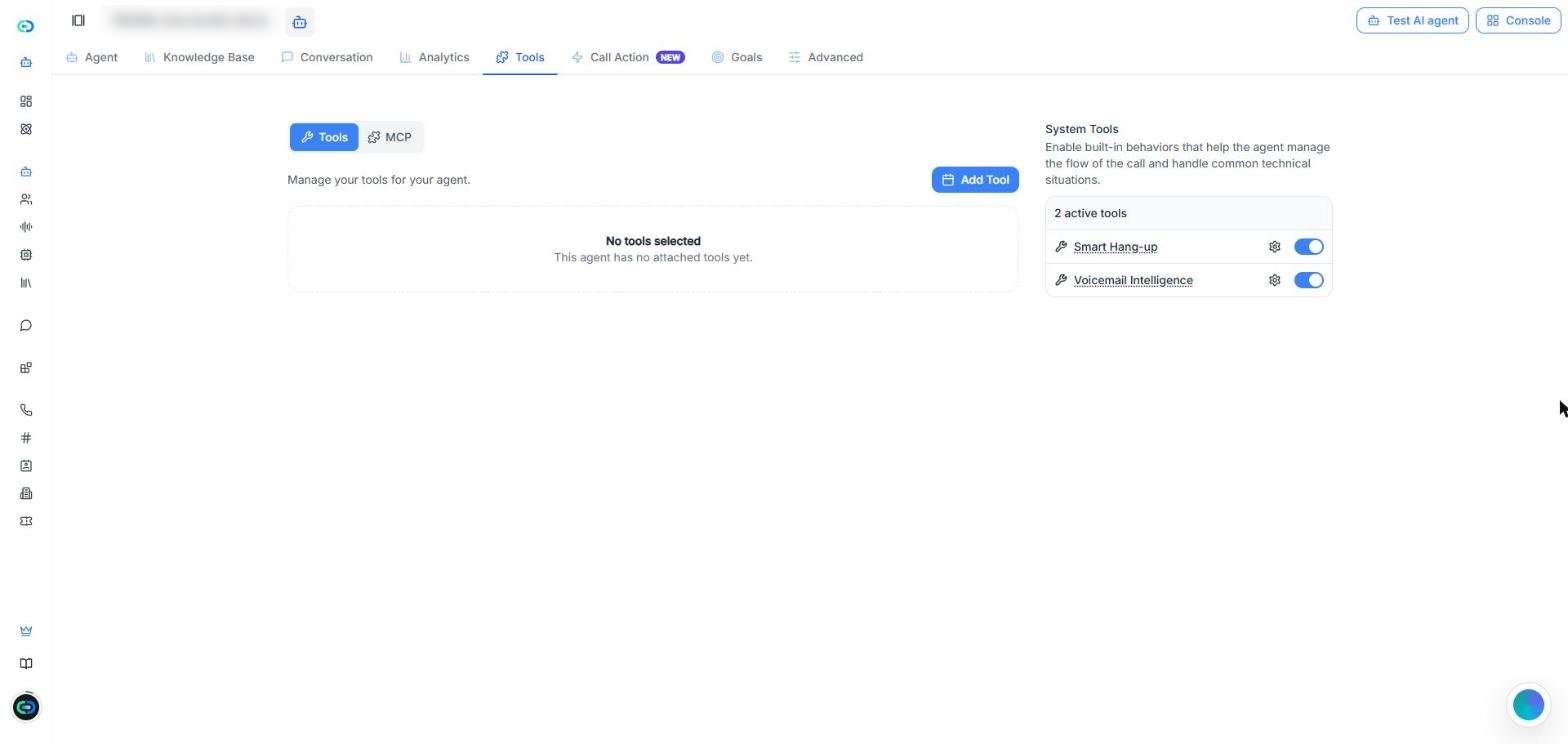
Screenshot: the Tools tab. Ultra-low latency agents have two system tools.
Transfer to agent and Transfer to number aren’t in this list. To pass the call to another agent, use a Squad.
Call Action
The Call Action tab has four actions:- Post-Call Summary Email — sends the call details to the email addresses you choose when the call ends.
- Data Sync (Post-Call Webhook) — sends the call details and captured data to another system, such as a CRM. Enter the webhook URL.
- Information Capture (Data Extraction) — click Add Entity for each detail the agent should identify and save, like names or dates.
- Persistence & Connection (Call Retry) — Retry Attempts (Retry Count) sets how many times to try again when the call isn’t answered or reaches voicemail, and Wait Time Between Tries (Retry Delay) sets the minutes between tries.
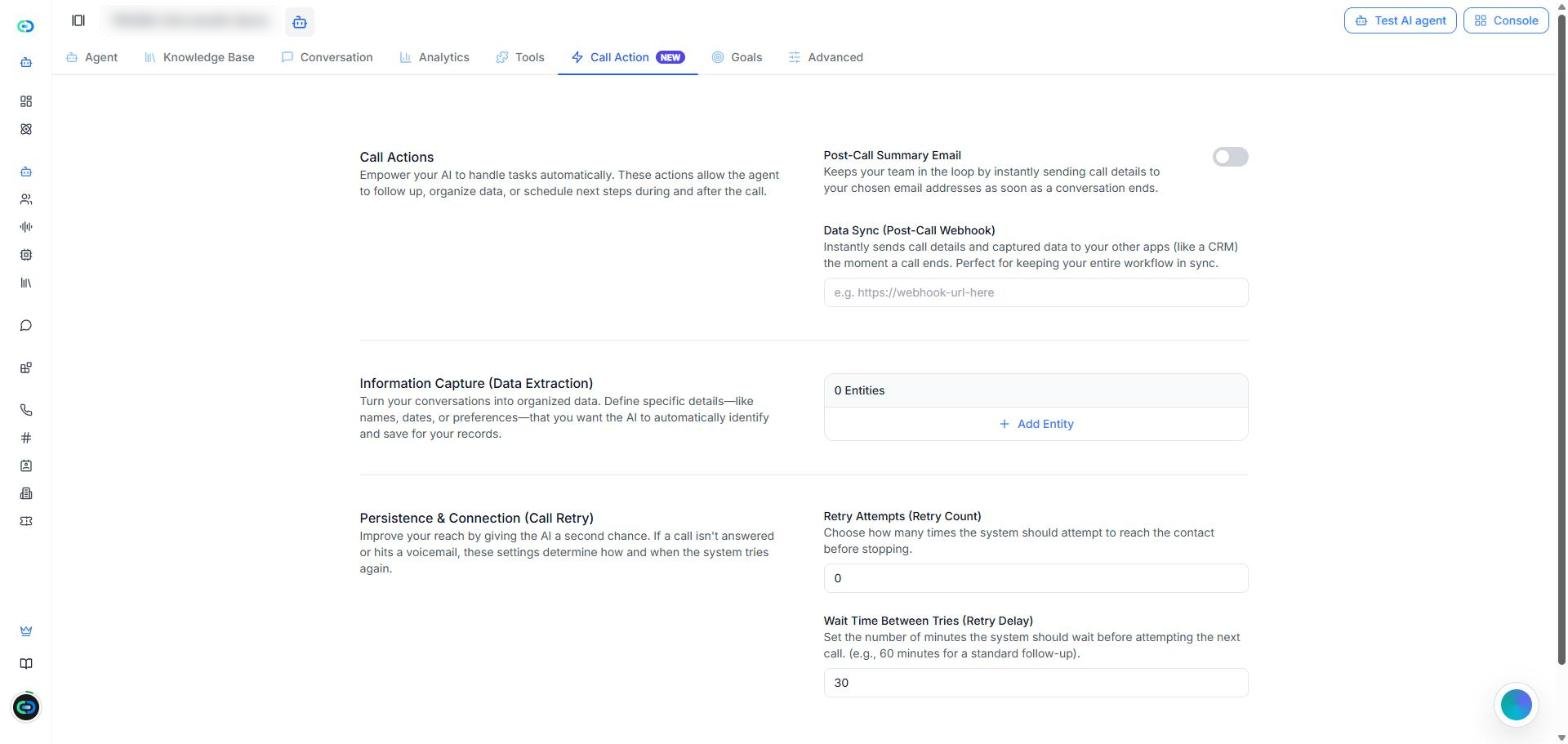
Screenshot: the Call Action tab of an Ultra-low latency agent.
Goals
The Goals tab only exists in Ultra-low latency agents. You list what a good call should achieve. After each call, Callin.io checks whether each goal was met, and it can email you when a call needs attention.Video: add a goal → turn on email alerts → open Advanced options.
Step 1: What should a good call achieve?
Pick a ready-made goal or write your own:- Book an appointment — the caller agreed to a specific date and time.
- Qualify the lead — the call covered the need, the timeline, and whether the caller decides or has budget.
- Capture an email address — the agent got a usable email address.
- Write my own — your own goal.
Step 2: Get an email when something’s off
Turn on Email me when a call needs attention to get one short email per call, only when a goal was missed or took too many retries. Then:- Send alerts to — type an email address and click Add. At least one is required (up to 20).
- Also email me when the caller sounds unhappy — sends the email even if the goals were met.
- Advanced options — Include hard-to-complete goals (alerts when a goal succeeded only after many repeats or corrections) and Include sentiment in the email (adds the caller’s overall mood).
Advanced
The Advanced tab has five blocks.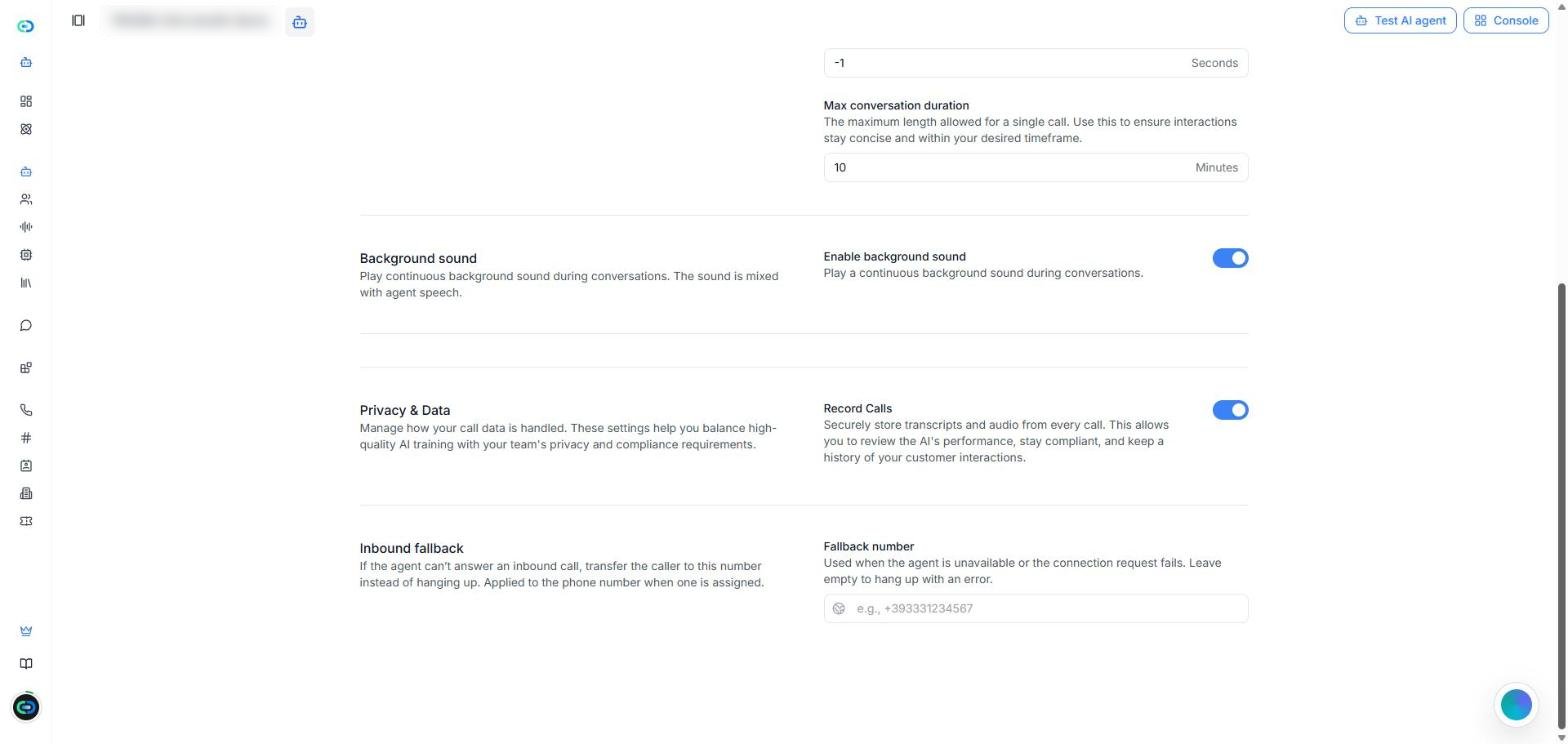
Screenshot: the end of the Advanced tab, with Privacy & Data and Inbound fallback.
- Voice & Understanding — Priority Keywords: terms the agent should recognize better, separated by commas.
- Conversation Flow — Take turn after silence (seconds the agent waits after the caller stops speaking), End conversation after silence (seconds of silence before the call ends; -1 means never), and Max conversation duration (minutes).
- Background sound — Enable background sound plays a continuous sound mixed with the agent’s voice.
- Privacy & Data — Record Calls stores the transcript and audio of every call.
- Inbound fallback — see below.
Inbound fallback
Inbound fallback is a phone number. If the agent can’t answer an incoming call (it’s unavailable or the connection fails), the call is forwarded to that number instead of ending. Enter it in Fallback number. The number applies to the phone number assigned to the agent. Leave it empty and the call ends with an error in those cases.Troubleshooting
”I can’t find the Workflow (or Website widget) tab”
Cause: The agent uses the Ultra-low latency stack, which doesn’t have those tabs.Fix: Use a Premium Voice agent if you need a workflow or a website widget. The stack is chosen when you create the agent.
”I can’t choose the AI model or the call direction”
Cause: Ultra-low latency agents don’t have the AI Intelligence (LLM) or Call Direction settings.Fix: Nothing to fix. The agents list shows these agents as Inbound & Outbound. If you need to choose a specific AI model, use a Premium Voice agent.
”How do I set a number for incoming calls when the agent can’t answer?”
Use Inbound fallback in the Advanced tab: enter the Fallback number. If you leave it empty, the call ends with an error when the agent can’t answer. See Inbound fallback.”I can’t add my agent to a squad”
Cause: Only Ultra-low latency agents can join a squad.Fix: Check the agent’s stack in the agents list (Enhanced label). See Squads.